There’s a moment when you realize your bathroom isn’t actually dirty—it just looks worn out. You’ve cleaned the tiles, polished the mirror, even swapped in fresh towels. Yet those dull, gray grout lines ruin the whole effect, making everything feel older than it is.
One simple trick can change that in just 15 minutes—and the ingredients are probably already in your kitchen.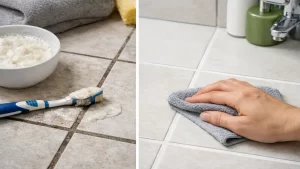
Why Grout Looks Dirty Even After Cleaning
Grout behaves like a sponge. Over time, it absorbs moisture, soap residue, oils, and mineral deposits. While tiles stay relatively shiny, grout quietly darkens.
This happens gradually:
Cream-colored lines turn gray
Areas near the toilet may yellow
Shower corners can become nearly black
Regular cleaners often fail because they only clean the surface. Even bleach, while effective at whitening, can weaken grout over time, making it brittle.
That’s why a smarter, gentler approach works better.
The 3-Ingredient Grout Cleaning Trick
This simple mixture combines three everyday items that work together to lift dirt, dissolve buildup, and cut grease.
What You’ll Need
3 tablespoons baking soda
1 tablespoon white vinegar
1 tablespoon dish soap
How to Use It
Mix ingredients in a small bowl (it will foam slightly).
Stir until it forms a thick paste.
Apply directly onto grout using an old toothbrush.
Let sit for 10–15 minutes.
Scrub gently.
Wipe with a damp cloth and rinse with warm water.
The result? Noticeably brighter grout that can make your entire bathroom look refreshed.
Why This Method Works
Each ingredient has a specific role:
Baking soda: A mild abrasive that lifts stains without scratching
White vinegar: Breaks down mineral deposits and soap scum
Dish soap: Cuts grease and helps the mixture spread evenly
Together, they don’t just clean the surface—they pull dirt out of the grout.
Common Mistakes to Avoid
Many people overdo it. Here’s what not to do:
Don’t soak the floor with too much liquid
Don’t use excessive vinegar
Don’t scrub aggressively
Gentle pressure is enough—the mixture does most of the work.
How Often Should You Clean Grout?
You don’t need to do this weekly. A realistic schedule:
Every 2–3 months for most bathrooms
Spot-clean high-use areas as needed
Even a single session can lighten grout by a noticeable shade, making the entire space feel cleaner.
A Small Change That Makes a Big Difference
Clean grout changes how your whole bathroom feels. Instead of looking worn out, it looks maintained and fresh.
And once you’ve seen the difference, it becomes easier to keep things under control with minimal effort.
Key Takeaways
| Key Point | Detail | Value |
|---|---|---|
| Simple recipe | Baking soda, vinegar, dish soap | Low-cost and accessible |
| Fast results | 15-minute process | No long cleaning sessions |
| Gentle cleaning | No harsh chemicals | Safer for surfaces and air |
FAQs
1. Can I use this mix on colored grout?
Yes, it’s generally safe. However, test a small hidden area first, especially on darker grout, to ensure there’s no fading.
2. Does this remove mold?
It helps remove surface mold and reduce odors. For deep mold, you may need repeated treatments or a specialized cleaner.
3. How often should I use this method?
Every 2–3 months is enough for most homes. High-traffic areas may need more frequent touch-ups.
4. Can I store the mixture?
No. The reaction between baking soda and vinegar reduces its effectiveness over time. Always make fresh batches.
5. Is it safe for natural stone tiles?
Not with vinegar. For stone surfaces like marble or limestone, skip the vinegar and mix baking soda with dish soap and water instead.