You notice it the moment the light hits your kitchen surface. A pale, jagged scratch suddenly appears across the smooth black glass cooktop you once admired.
Maybe a heavy pot slid across the surface, or a small grain of salt became trapped beneath a pan. Whatever the cause, the mark now stands out every time you walk into the kitchen. When you run your fingers over the spot, you can feel the rough edge—and the worry begins.
Is the damage permanent? Should the cooktop be replaced? Or can it actually be fixed?
The good news is that many glass cooktop scratches are only cosmetic. With the right tools and careful polishing, it’s often possible to make them much less noticeable.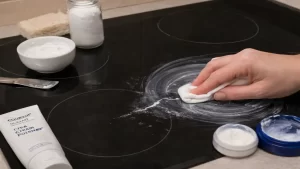
5 Ways to Fix Glass Cooktop Scratches — Simple At-Home Solutions That Save Money
Why Glass Cooktops Get Scratches
Glass cooktops are designed to look sleek and modern while handling everyday cooking tasks. Despite their durable appearance, the surface can still be vulnerable to scratches.
Common causes include:
Sliding heavy pots or pans across the surface
Salt, sugar, or food particles trapped under cookware
Rough-bottom cookware such as cast iron
Cleaning with abrasive pads or tools
Sometimes scratches appear suddenly, but many people only notice them later while cleaning.
Fortunately, light scratches are often easy to reduce with gentle polishing methods.
Step 1: Check How Deep the Scratch Is
Before attempting any repair, inspect the scratch closely under good lighting.
You can usually classify scratches into three levels:
1. Light Surface Marks
Only visible at certain angles
Your fingernail does not catch on them
Usually the easiest to remove
2. Moderate Scratches
Clearly visible lines
Fingernail may slightly catch
Can often be improved with polishing
3. Deep Grooves
Nail catches strongly
Scratch feels rough and deep
Difficult to fully remove at home
Understanding the scratch level helps set realistic expectations before starting repairs.
Step 2: Prepare the Surface Properly
Before polishing, the cooktop must be completely clean.
Follow these steps:
Clean the cooktop with a glass-safe cleaner.
Use a soft microfiber cloth to wipe away grease or residue.
Dry the surface thoroughly.
Avoid harsh tools such as:
Steel wool
Abrasive sponges
Rough scrubbers
These can create additional scratches.
Step 3: Try Gentle Scratch-Removal Methods
For light or moderate scratches, several simple methods may help smooth the surface.
Always test the method on a small hidden area first.
Baking Soda Paste
Mix baking soda with a little water to form a paste.
Rub gently in small circular motions using a microfiber cloth.
Non-Gel Toothpaste
Regular toothpaste contains mild abrasives that can polish glass.
Apply a small amount and rub gently over the scratch.
Ceramic Cooktop Cream
Specialized cooktop creams are designed specifically for glass surfaces.
They can restore shine and reduce visible marks.
Glass Polishing Compound
For multiple or stubborn scratches, a glass polishing compound may provide stronger results—but should be used carefully.
Comparison of Common Repair Methods
| Method | Best For | Benefits | Possible Drawbacks |
|---|---|---|---|
| Baking soda paste | Small scratches | Cheap, gentle, easy to find | Limited effect on deep scratches |
| Non-gel toothpaste | Light scratches | Easy polishing solution | May require repeated attempts |
| Ceramic cooktop cream | Light to moderate damage | Made specifically for glass | More expensive than home options |
| Glass polishing compound | Stubborn scratches | Strong polishing ability | Must be used carefully |
Step 4: Restore the Cooktop’s Shine
After polishing:
Clean the surface again to remove residue.
Apply a thin layer of cooktop cleaner if desired.
Buff the surface with a dry microfiber cloth.
The scratch may still exist, but it often becomes far less noticeable once the surface regains its shine.
How to Prevent Future Scratches
Small daily habits can significantly reduce the chance of scratches.
Helpful tips include:
Lift cookware instead of sliding it
Wipe the bottom of pans before placing them on the cooktop
Clean salt or sugar spills immediately
Avoid rough-bottom cookware
Use only cooktop-safe cleaning tools
These simple changes can keep your glass cooktop looking newer for longer.
When Replacement May Be Necessary
In most cases, scratches are only cosmetic and do not affect the cooktop’s performance.
However, professional help may be needed if:
The scratch looks like a crack
The damage becomes larger over time
The surface feels deeply gouged
Structural damage can affect heat resistance and safety, so replacement might be the better option in those cases.
Final Thoughts
Glass cooktops combine beauty with functionality, but even careful kitchens can develop small scratches over time. Fortunately, many of these marks are not permanent. With gentle polishing techniques and proper maintenance, you can restore much of the cooktop’s smooth appearance.
Most importantly, understanding how to care for the surface helps you cook with confidence—without worrying about every tiny mark.
Frequently Asked Questions (FAQs)
1. Can scratches on a glass cooktop be completely removed?
Light scratches can often be polished away, but deeper scratches may only become less visible rather than fully disappear.
2. Is toothpaste safe for cleaning glass cooktops?
Yes, non-gel toothpaste can act as a mild abrasive and help polish light scratches when used gently.
3. Can deep scratches damage the cooktop?
Deep scratches may weaken the surface and, in rare cases, affect heat resistance. If the scratch looks like a crack, professional inspection is recommended.
4. What cookware is most likely to scratch a glass cooktop?
Heavy cookware with rough or uneven bottoms, especially cast iron, can increase the risk of scratching.
5. What is the safest way to clean a glass cooktop?
Use a cooktop-safe cleaner and a microfiber cloth. Avoid abrasive pads or harsh scrubbing tools.